📝 The Story Behind the Recipe
There’s something magical about red velvet — that deep red hue, the soft chocolate aroma, and the velvety smooth texture that melts in your mouth. Now, imagine pairing that with the dark, crunchy perfection of Oreos and the silky richness of cheesecake. That, my friend, is what dessert dreams are made of — the Red Velvet Oreo Cheesecake.
This recipe was born one chilly winter evening in my kitchen when I wanted to surprise my family with something both familiar and extraordinary. My husband loves Oreos. My kids adore cheesecake. And I’ve always had a soft spot for red velvet. So, I thought — why not bring all three together into one unforgettable dessert? The first time I served it, the table went quiet after the first bite (always a good sign, right?). Then came the wide-eyed smiles. That’s when I knew — this cheesecake wasn’t just delicious; it was memorable.
What Makes This Recipe So Special 🍰✨
There are cheesecakes, and then there’s this cheesecake — a luxurious marriage of textures and flavors:
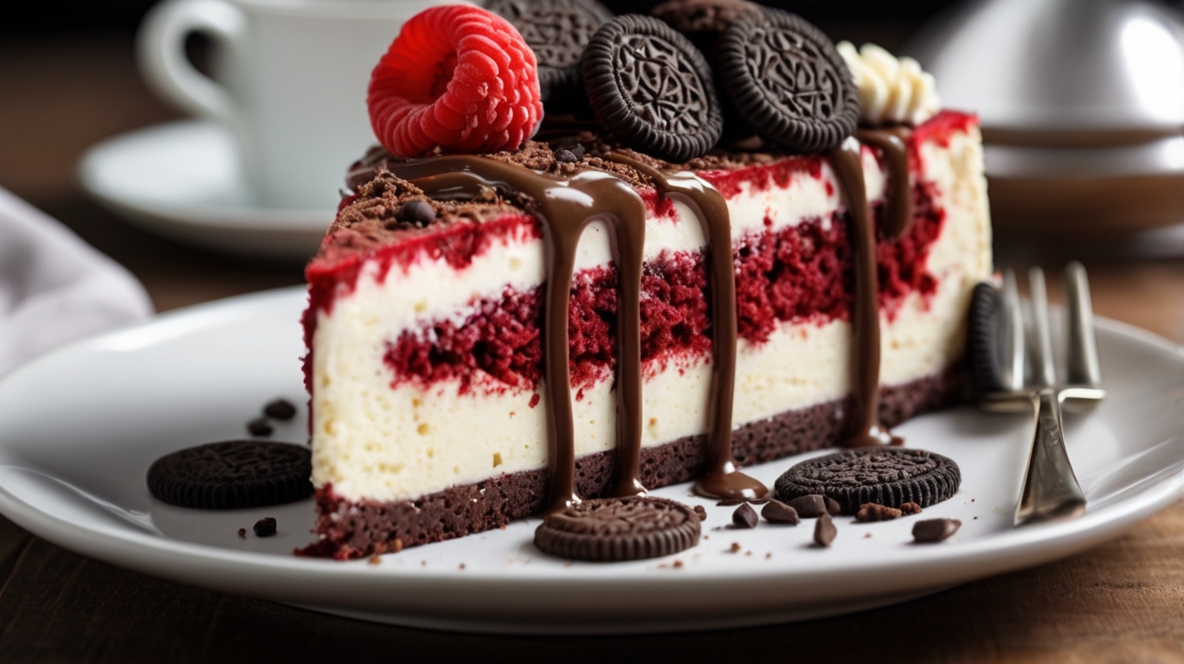
- The Oreo crust brings crunch, darkness, and depth.
- The red velvet cheesecake filling adds creaminess and romance in every spoonful.
- The whipped topping finishes it off with a light, cloud-like sweetness that balances the richness beautifully.
This recipe is perfect for:
- Valentine’s Day or anniversaries ❤️
- Holiday tables when you want to impress 🎄
- Birthdays and potlucks when you want to steal the spotlight 🎉
Every bite feels like a celebration — a creamy, chocolatey, tangy dance on your tongue that keeps calling you back for just one more forkful.
Ingredients – Simple, Sweet & Full of Love 🛒🍫
For the Crust:
- 24 Oreo cookies (finely crushed, with the filling)
- 5 tablespoons melted unsalted butter
For the Red Velvet Cheesecake Filling:
- 16 oz (450g) full-fat cream cheese, softened to room temperature
- ¾ cup granulated sugar
- 2 large eggs
- 2 tablespoons unsweetened cocoa powder
- ½ cup sour cream (adds creaminess and tang)
- 2 tablespoons buttermilk (classic red velvet tang)
- 1 teaspoon vanilla extract
- 1 tablespoon red gel food coloring (for that deep, bold hue)
- 8 Oreo cookies, roughly chopped
For the Whipped Cream Topping:
- 1 cup heavy whipping cream
- 2 tablespoons powdered sugar
- ½ teaspoon vanilla extract
For Garnish:
- Crushed Oreos
- Red velvet cake crumbs (optional, but gorgeous!)
- Shaved dark chocolate or chocolate drizzle
Step-by-Step Instructions 👩🍳🔥
Step 1: Prep & Preheat the Love 🧡
Set your oven to 325°F (160°C) and grease a 9-inch springform pan. This will make it easier to release your cheesecake later.
Crush your Oreos (filling and all) in a food processor until fine crumbs form. Add melted butter and pulse until it feels like wet sand. Pour the mixture into your pan and press it down evenly using the back of a spoon. Bake for 8–10 minutes to set the crust, then let it cool completely.
Step 2: Create the Creamy Red Velvet Magic ❤️
In a large mixing bowl, beat your softened cream cheese until smooth — no lumps allowed! Add sugar and beat again until creamy and fluffy.
Next, add eggs one at a time, beating slowly after each addition. This ensures your cheesecake doesn’t get overmixed (which can cause cracks later).
Now add your cocoa powder, sour cream, buttermilk, and vanilla extract. Mix until well combined. The batter should be rich, thick, and silky.
Finally, stir in the red gel food coloring. Start with a little and add more until you reach that perfect red velvet shade — vibrant but elegant.
Fold in your chopped Oreos gently — just enough to swirl them through without breaking them too small. Those little Oreo pockets inside the red batter are pure gold later!
Step 3: Bake It Low & Slow 🔥🍰
Pour your cheesecake batter onto the cooled Oreo crust. Tap the pan lightly on the counter to remove any air bubbles.
Place your springform pan in a large roasting pan and fill it halfway with hot water (the water bath helps prevent cracks and keeps your cheesecake moist).
Bake for 55–65 minutes, or until the edges are firm but the center still has a gentle jiggle.
When done, turn off the oven and crack the door slightly open. Let the cheesecake rest inside for 1 hour — this gentle cooling process prevents the top from sinking.
Step 4: Chill & Set Overnight ❄️
Remove the cheesecake from the water bath, pat the pan dry, and let it cool completely. Then cover with plastic wrap and refrigerate for at least 6 hours, or ideally overnight.
This step is non-negotiable — it allows the flavors to bloom and the texture to become velvety smooth.
Step 5: Whip, Decorate & Fall in Love 🍫💞
Whip your heavy cream with powdered sugar and vanilla until soft peaks form.
Spread or pipe it over your chilled cheesecake. Now it’s time to get creative!
Sprinkle with crushed Oreos, scatter a few red velvet crumbs, and drizzle with melted chocolate for a dramatic touch.
If you’re feeling fancy, add chocolate curls or a dusting of cocoa powder — it turns the dessert into a showstopper worthy of a bakery window.
Serving Suggestions – How to Make It Shine 🌟
- Serve slices with a drizzle of chocolate or raspberry sauce for a beautiful contrast.
- Top each slice with a dollop of whipped cream and a mini Oreo for presentation points.
- Pair it with coffee or red wine — both bring out the richness of cocoa beautifully.
- Want to go over the top? Serve with a scoop of vanilla ice cream for the ultimate dessert indulgence! 🍦
Customization & Variations 🧁🎨
- No-bake version: Skip the eggs, add 2 teaspoons gelatin, and let it set in the fridge.
- Add chocolate chips: For extra crunch in the filling.
- Use Golden Oreos: For a lighter twist and creamier flavor.
- Make it mini: Use cupcake liners and bake individual cheesecakes for parties!
- Add a ganache layer: Pour warm chocolate ganache over the top before chilling — totally worth it.
Storage & Reheating 🧊
- Refrigerate: Up to 5 days, covered tightly.
- Freeze: Slice, wrap each piece, and freeze for 1 month. Thaw overnight before serving.
- Serve chilled: Cheesecake always tastes best straight from the fridge.
Pro tip: Wipe your knife between slices for perfectly clean cuts every time. 🍰
Nutritional Snapshot (Per Slice – Approx.) 📊
- Calories: 430 kcal
- Fat: 30g
- Carbs: 34g
- Protein: 7g
- Sugar: 25g
It’s not diet food — it’s happiness food! And every bite is 100% worth it.
Reader Q&A – Common Questions 💬
1. Can I make this ahead of time?
Absolutely! It’s even better the next day when chilled overnight.
2. Can I skip the water bath?
You can, but it may crack slightly. Don’t worry — whipped cream hides everything!
3. How do I get the perfect red color?
Use gel food coloring, not liquid. It gives intense color without thinning the batter.
4. Can I use low-fat cream cheese?
I don’t recommend it — you’ll lose that creamy texture.
5. Can I add chocolate ganache on top?
Yes! Pour it over once the cheesecake cools for a glossy, rich finish.
6. What can I use instead of buttermilk?
Mix ½ cup milk with 1 tsp lemon juice — let it sit 5 minutes.
7. Why did my cheesecake crack?
Usually overbaking or sudden temperature changes. A slow cool helps avoid that.
8. Can I use red velvet Oreos?
Yes! They’re perfect for doubling down on that red velvet flavor.
9. Can I make this gluten-free?
Yes, use gluten-free Oreos and check that your cocoa powder and extracts are GF.
10. How long should I chill before slicing?
At least 6 hours, but overnight gives the best texture and flavor.
Final Thoughts ❤️🍰
This Red Velvet Oreo Cheesecake isn’t just dessert — it’s a love letter in edible form. The moment you slice through that red, velvety layer and hit the dark Oreo crust, you’ll understand why this recipe has become one of my most requested desserts ever.
It’s sweet but balanced, rich yet soft, elegant but comforting — everything you want from a homemade treat. And whether you bake it for a date night, your family, or just yourself (because you deserve it), it’ll always leave hearts melting and plates empty.
So go ahead, preheat that oven, put on some soft music, and let your kitchen smell like chocolate, love, and pure joy. ❤️
🍽️ Tried This Recipe?
I’d love to hear how your Red Velvet Oreo Cheesecake turned out! 💬
Tag your photos and follow Mama Cooks Dinner on Pinterest for more heartwarming desserts and cozy recipes you’ll fall in love with again and again.
| Join us on Telegram for quick updates 👉 | Join Now |
| Join us on WhatsApp for free tips 👉 | Join Now |
| Read a New Recipe 👉 | Read Now |

Hi, I’m Sayan, the creator behind Mamacooksdinner.com. I’m passionate about making home cooking easy and enjoyable for everyone. Whether you’re a beginner or an experienced chef, my goal is to help you create delicious meals with simple ingredients.